Tech 3 Crew Mapping & Bookmarking: Difference between revisions
| (9 intermediate revisions by the same user not shown) | |||
| Line 88: | Line 88: | ||
Should one chain connect to another (again, this is very rare) then continue out of that system with whichever name it had ''first'' | Should one chain connect to another (again, this is very rare) then continue out of that system with whichever name it had ''first''. | ||
| Line 94: | Line 94: | ||
[[File:ChainIDExample3.png]] | [[File:ChainIDExample3.png]] | ||
==== Mapping Best Practice ==== | ==== Mapping Best Practice ==== | ||
| Line 100: | Line 99: | ||
* Extra Information in Bookmarks (i.e after "A51 FEB C1-3" adding extra info such as wormhole mass size) | * Extra Information in Bookmarks (i.e after "A51 FEB C1-3" adding extra info such as wormhole mass size) | ||
** Maximum Jump Mass: "A51 FEB C1-3 Large" or "A51 FEB C1-3 Frig". If it's not large it's nice if you add it to the map, to do this right click the line connecting the two systems and select Ship Size. | ** Maximum Jump Mass: "A51 FEB C1-3 Large" or "A51 FEB C1-3 Frig". If it's not large it's nice if you add it to the map, to do this right click the line connecting the two systems and select Ship Size. | ||
** | ** It's remaining life time, either <4 for less than four hours remaining, or <1 for less than one. | ||
* Always keep our C5 Static as ALPHA, and our C3 Static as BRAVO. This makes identifying chains easier when rolling them, and simply means if you open a wormhole that's not one of our statics, start at DELTA, if it's the C3 Static start at BRAVO. | * Always keep our C5 Static as ALPHA, and our C3 Static as BRAVO. This makes identifying chains easier when rolling them, and simply means if you open a wormhole that's not one of our statics, start at DELTA, if it's the C3 Static start at BRAVO. | ||
* | ** In the C5 Farm always try to keep our C5 Static as ZULU, and work backwards through YANKEE, XRAY, WHISKEY, etc. | ||
=== Lasse's Mapping Method === | |||
The section under ChainID is required, this next section is just how I personally scan systems, chains, and how I map them because maybe you'll find some or all of it useful to augment your own scanning methods. | |||
==== Fittings & Implants ==== | |||
I've been playing a long time, and just want to scan as quickly and easily as possible. To that end I use a fully Scan fit Tengu with: | |||
* Subsystems (Built for maximizing Scanning, and Slipperiness): | |||
** Chassis Optimization | |||
** Accelerated Ejection Bay | |||
** Covert Reconfiguration | |||
** Augmented Graviton Reactor | |||
* Sub-3 Second Align Time (Two Inertial Stabs) | |||
* A Warp Core Stabilizer (I've never needed this) | |||
* Five Scanning Mids | |||
** 2x Rangefinding | |||
** 2x Pinpointing | |||
** 1x Aquisition | |||
* A Simple Microwarpdrive for burning off of wormholes under cloak | |||
* Five Neutralizers to Neut out Tackle (I've never needed this) | |||
* Interdiction Nullifier (Use the Tech 1, it's got better Reactivation Delay than Meta or Tech 2) | |||
* Sisters Expanded Probe Launcher | |||
** Combat Probes are Exactly as strong as Core Probes, but cannot scan at 0.25AU. I do carry a set of Sisters Core Scanner Probes, but haven't used them at all. | |||
** 16 Satori-Horigu Combat Scanner Probe, Technically only need 8, but it's convenient to have a reload. These are the strongest Probes in the game at time of writing. | |||
* Covert Ops Cloaking Device | |||
* Two Hyperspatial Tech 1 Rigs | |||
* A Tech 2 Gravity Capacitor Upgrade for Scan Strength. | |||
* A Mobile Depot for refitting | |||
** A Shield Extender, Shield Extender Rigs, and Shield Hardeners for running Ghost Sites | |||
** Ship Scanner for Scanning Structure Fittings | |||
** Zeugma Integrated Analyzer for Hacking Sites or Structure Timers. | |||
For Implants I run a full set of Mid-grade Virtues, I cannot recommend them enough once you're secure in your piloting and won't lose your scanner. For the other four: | |||
* AQ-710 | |||
* AR-810 | |||
* 920-40 | |||
* EY-1005 | |||
[[File:LasseTengu.png]] | |||
==== The Steps ==== | |||
This will be done from the Point of View of the C5 Farm, so expect starting at ZULU rather than ALPHA and BRAVO for Statics. If you're not in the mood for scanning, please at least undock in anything and copy paste signatures from Probe Scanner to Wanderer as described in step 2 using Lazy Delete. | |||
# Jump Clone to Scanner Implant Set. | |||
#* Yes I've forgotten to do this before. Took me a bit to figure out why scanning was so slow that day. | |||
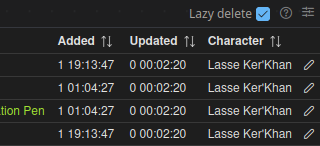
# Undock Scanner and copy all sigs and anoms from probe scanner to wanderer '''making sure to turn on lazy delete'''. | |||
#:- [[File:LazyDelete.png]] | |||
#* Make sure you have the right system selected, once you start down the chain Wanderer should auto-select the system you've jumped to. | |||
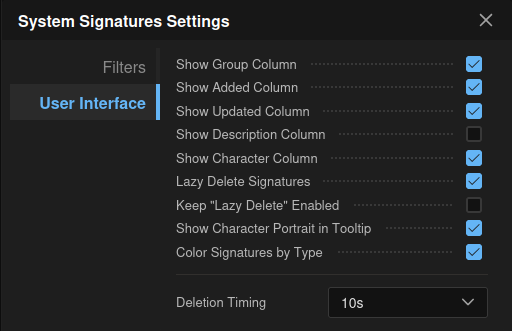
#* You can turn on Always Lazy Delete in the Settings for the Signature Window. Should you accidentally Lazy Delete the wrong system or the wrong signatures you have 10 seconds to press undo. | |||
#:- [[File:AlwaysDelete.png]] | |||
#* To quickly copy, click anything in your probe scanner, hit ctrl+A, ctrl+C, switch to your Wanderer Tab and hit ctrl+V, quick and easy. | |||
# Look at Signatures in Wanderer, Remove any bookmarks in game where the Signature is no longer present. | |||
# Scan Down the Signatures that are unknown in Wanderer, then copy paste the whole list again. | |||
#* I won't tell you how to scan, because everyone has their own opinions on it and there is no "Best" way. | |||
# Bookmark any Signatures that are not already bookmarked and are not Wormholes. | |||
# Warp to any Wormholes that are not bookmarked, and follow ChainID methodology to Bookmark it. | |||
#* Either warp to 0, 70, or 100. Warping between 5 and 20km can cause you to decloak on the wormhole. I personally use 0 so I can jump through it immediately without needing to bounce. | |||
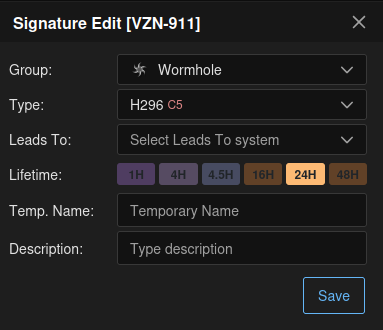
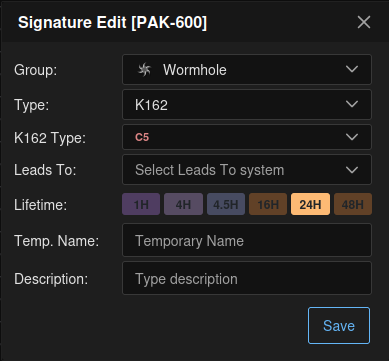
# '''Important Quality of Life Step added with Wanderer'''. Double click the Wormhole in the Signature list on Wanderer, and set the Type. If it's K162 try to identify which class it goes to too, otherwise leave "K162 Type" blank. Also set lifetime if it's 4h or 1h. | |||
#:- [[File:SigEdit.png]][[File:SigEditK162.png]] | |||
#* You will shortly see why we do this. | |||
# Splash the first Wormhole you'd like to Chain Scan through, and make a brief note in your head of which sig it is. You have to just get a feeling for which chains are best for whatever your goal is. | |||
#* If you're looking to do a lot of Logistics, ignore holes with 4 Hours or less remaining. If necessary roll a Static to get a Chain that isn't less than 4 Hours. | |||
#* Always ignore 1 Hour or Less Wormholes. | |||
# '''Bookmark your *Home or *Farm Hole but don't click submit''', launch your probes as you cloak and orbit your return hole at 4,500 meters, center probe formation on your ship and scan 0.5AU. Add the Signature you've now scanned to the bookmark and Submit. If there are targets to kill on D Scan, focus on that ''after you've bookmarked your return hole'', and move your probes out to range in the system so they're off D Scan, or recall them. For this example we will assume you do not run into other players, I expect you to know how to deal with finding players. | |||
#* I recommend setting your default orbit to 4,500 meters, it's convenient, keeping your orbit wide but close enough to splash hole immediately after you decloak should you need to. | |||
# You've got a pop-up in your Wanderer page now, asking which of the Signatures you'd like to update. Click the one you just jumped. ''This will automatically populate the system connection in the Signatures Window.'' | |||
#* In a rare instance where you don't get the pop-up, double click the signature you've just jumped '''with your prior system selected''', and set "Leads To" to the system you're now in, '''then select the system you're now in again.''' | |||
# Double Click the System and rename it in accordance with ChainID. Label it with information if applicable. | |||
# Copy all signatures again from Probe Scanner to Wanderer. | |||
# Scan down all Signatures | |||
#* As soon as you know something isn't a wormhole you are free to "right-click -> ignore" it, we will clear this shortly but it makes it easier to keep oversight. | |||
#* You can also filter out Anomalies for now, but we will add them back in shortly. | |||
#* If using Satori-Horigu watch your Probe Timeout, and recall if necessary, simply decloak, redeploy, cloak. | |||
# '''Clear your ignored list, and filter to include Anomalies again.''' Then copy to Wanderer again. All signatures in Wanderer should be known, even if not scanned all the way down. | |||
# Check which wormhole signature leads back, double click it in Wanderer and set "Leads To" to your previous system. The Wormhole Type is not necessary. | |||
# Warp to each wormhole, Bookmark it using ChainID '''and mark it's type and K162 Type (If known) on Wanderer'''. | |||
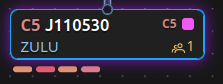
# Note now how on Wanderer there are little bars under the system you've just scanned. Those show how many wormholes have not yet been mapped. This tells both you how many more chains you can explore, and other scanners that there's more chains to scan from this system. Setting the type also colours these bars certain colours based on the Wormhole Type. | |||
#:- [[File:WormholeBars.png]] | |||
# Return to Step 8 and continue until you have a connection you like, have found content, or you are bored of scanning. | |||
Latest revision as of 15:19, 21 October 2025
Foreword
Over the years T3C started out using publicly hosted Tripwire, then after a few years we transitioned to Pathfinder, in this case a fork of the original now maintained by Goryn Clade. Our bookmarking methods have gone through at least half a dozen iterations, before landing on the method we now use, largely copied from Almost Dangerous, of Wolves Among Strangers after my year flying with them. Almost Dangerous have a modified Pathfinder system that far more neatly integrates ChainID into the map, we have yet to modify ours at all but likely will do similar some day.
This guide is aimed at our own members, but wormhole groups or individuals looking to streamline their bookmarks may find use in it too.
This Guide assumes you understand basic EVE Mechanics, if you feel there are errors or room for extra explanation send an EVE Mail to Lasse Ker'Khan in game (Or just send a message in Discord if you're in T3C).
Terminology
Wanderer: A third party browser-based mapping tool used to track where systems in J Space are located relative to each other.
J Space: Systems in EVE Online outside of New Eden, also known as Wormhole Systems.
J Code: The "Name" of a J Space system, the letter J followed by six numbers.
ChainID: A Unique Identifier for each system currently on the map, relative to which chain it is in.
Splash: Means the same as Jump, but for a wormhole.
The Process
The longest bookmarking system we used before our present one operated similarly at a base level, it was Signature Letters, Destination Class, and Destination (Last three Digits of J Code if J Space). For example GTI C3 615 meant it was Signature GTI, led to Class 3 J Space, to a System with J Code ending 615, all the basic info quick and simple. This system had two major issues, firstly knowing the system name made having the class redundant, if it was Perimeter everyone already knew it was HS. But secondly and far more significantly if we had a larger map with more than 10 to 16 systems on it, even the full J Code J100615 required everyone to search the map for that name every time content was found in such a system. This is solved with ChainID, a Unique Identifier for each system on the name, relative to where it is in chain. Again, this was designed by Almost Dangerous, and we merely took it over as our main method.
We now use ChainID, Signature Letters, Destination Class (e.g C3, C6, HS, NS, etc)
ChainID
The ChainID is a classic case of seeming really complex initially, then after a day of using it you ask yourself why it felt so complicated initially. The further away from our home system you are the more number of digits the ChainID contains, the actual number in each does not say anything about distance from home. By setting each subsequently added digit as a child of the prior as will be described in a simple example following, any system becomes trivial to find even for people who do not have the map open at all, massively improving response times as people only need to get in their ships, and can open the map while they're already traveling.
Letters are more quick to identify, and are used for the very first system in a chain. Any word is fine as long as it's easily identifiable, for simplicity I always use ALPHA and BRAVO. NOTE: Always skip CHARLIE, or the letter C in general, it can lead to confusion as will be explained in the example.
Simple Example
Let's assume you've splashed our C5 Static, you are in the first chain out of home, therefor the system you are in is A, or ALPHA.
Note: For simplicity and clarity our C5 Farm Hole will start at the other end of the Alphabet, so you start at ZULU, with ZULU always being our C5 Static. This guide operates from the point of view of our C4, so will work from ALPHA and BRAVO onward.
The Bookmark from home would be: [ALPHA RXI C5] Where the first bit is ChainID, the second are the first three letters of the Wormhole Signature RXI, and the last tells you it leads to C5.
The Bookmark back home, no matter how far down a chain you are, if it's toward home should be asterisk Home, with bonus points for including Signature, but this is not requires:
Note: For the C5 Farm use *Farm instead preferably, just in case the two chains merge at any point so it's clear how to get where.
*Home SUH
Now let's assume you've found 5 Wormholes inside ALPHA. Signatures RIT-098 leading to "Unknown parts of space", FRZ-657 leading to "High Security Space", HIT-836 leading to "Dangerous unknown parts of space", HEY-903 leading to "Unknown parts of space", and FIN-434 leading to "Deadly unknown parts of space". Some of us after years of playing can identify these by their 3D Visual appearance, however this guide will teach you the minimum requirement.
- To give each a ChainID, simply take the system you're in, "A", and append a unique number:
- A1 RIT C1-3
- A2 FRZ HS
- A3 HIT C4-5
- A4 HEY C1-3
- A5 FIN C6
^ This is how your list of bookmarks should look inside of ALPHA, topped by *Home
Note: This is where skipping C, or CHARLIE comes in. These ChainIDs in CHARLIE would be C1, C2, C3, etc. easily confused with Class 1, 2, or 3 wormholes. hence we simply skip the designation C.
Now, for how to Map this. Double click the system you want to ChainID to bring up the System Settings window, and completely replace the System Name with the ChainID. This will result in ChainID showing in blue underneath the system name on the map. If the system already has a ChainID that means we saw the system previously, simply replace the old ChainID with the new one.
If there's anything noteworthy in the system such as a DRB (Drifter Response/Recon Battleship) on the loose, it's worth adding this in the Label. Note however the Label only has 5 characters, so for DRB on the loose you'd just label it "DRB", This is not required but may save you or your corpmates some Rollers later :).

Continued Example
Let's now assume you've splashed into A5, the C6 wormhole J104859 (See again why having a ChainID starting with C would be annoying?). As always, your home bookmark is going to be *Home, with added Signature if you're cool.
Let's assume you've now found two wormholes. Signatures FEB-069 leading to "Unknown parts of space", and EUN-563 leading to "Null Security Space".
- Exactly as with the first system, to give each a ChainID, simply take the system you're in "A5", and append a unique number:
- A51 FEB C1-3
- A52 EUN NS
^ This is how your list of bookmarks should look inside of A5, topped by *Home
And our updated Map:

Closing Notes on ChainID
The core reasoning for doing this, and for using a Letter at the start is so when you hear "We have an Ishtar tackled in A52, need DPS" or "Help! I'm tackled in a DST in A51" you can first things first undock your ship and warp to ALPHA, because the first letter in the called out ChainID was A. you can then already be on the way as you gather more information, significantly improving response time.
- In the rare occurance that a system has more than 9 wormholes, use square brackets and continue numbering:
- A5[10]
- A5[11]
- and if the chain continues out of A5[10] then simply:
- A5[10]1
- A5[10]2
- A5[10]3
Should one chain connect to another (again, this is very rare) then continue out of that system with whichever name it had first.
Here an expanded example with BRAVO Chain added. The process is exactly the same, and should you add a third then that would be DELTA, D1, D2, D3, etc:

Mapping Best Practice
These are not necessary, and are merely quality of life improvements for others using the map and bookmarks:
- Extra Information in Bookmarks (i.e after "A51 FEB C1-3" adding extra info such as wormhole mass size)
- Maximum Jump Mass: "A51 FEB C1-3 Large" or "A51 FEB C1-3 Frig". If it's not large it's nice if you add it to the map, to do this right click the line connecting the two systems and select Ship Size.
- It's remaining life time, either <4 for less than four hours remaining, or <1 for less than one.
- Always keep our C5 Static as ALPHA, and our C3 Static as BRAVO. This makes identifying chains easier when rolling them, and simply means if you open a wormhole that's not one of our statics, start at DELTA, if it's the C3 Static start at BRAVO.
- In the C5 Farm always try to keep our C5 Static as ZULU, and work backwards through YANKEE, XRAY, WHISKEY, etc.
Lasse's Mapping Method
The section under ChainID is required, this next section is just how I personally scan systems, chains, and how I map them because maybe you'll find some or all of it useful to augment your own scanning methods.
Fittings & Implants
I've been playing a long time, and just want to scan as quickly and easily as possible. To that end I use a fully Scan fit Tengu with:
- Subsystems (Built for maximizing Scanning, and Slipperiness):
- Chassis Optimization
- Accelerated Ejection Bay
- Covert Reconfiguration
- Augmented Graviton Reactor
- Sub-3 Second Align Time (Two Inertial Stabs)
- A Warp Core Stabilizer (I've never needed this)
- Five Scanning Mids
- 2x Rangefinding
- 2x Pinpointing
- 1x Aquisition
- A Simple Microwarpdrive for burning off of wormholes under cloak
- Five Neutralizers to Neut out Tackle (I've never needed this)
- Interdiction Nullifier (Use the Tech 1, it's got better Reactivation Delay than Meta or Tech 2)
- Sisters Expanded Probe Launcher
- Combat Probes are Exactly as strong as Core Probes, but cannot scan at 0.25AU. I do carry a set of Sisters Core Scanner Probes, but haven't used them at all.
- 16 Satori-Horigu Combat Scanner Probe, Technically only need 8, but it's convenient to have a reload. These are the strongest Probes in the game at time of writing.
- Covert Ops Cloaking Device
- Two Hyperspatial Tech 1 Rigs
- A Tech 2 Gravity Capacitor Upgrade for Scan Strength.
- A Mobile Depot for refitting
- A Shield Extender, Shield Extender Rigs, and Shield Hardeners for running Ghost Sites
- Ship Scanner for Scanning Structure Fittings
- Zeugma Integrated Analyzer for Hacking Sites or Structure Timers.
For Implants I run a full set of Mid-grade Virtues, I cannot recommend them enough once you're secure in your piloting and won't lose your scanner. For the other four:
- AQ-710
- AR-810
- 920-40
- EY-1005

The Steps
This will be done from the Point of View of the C5 Farm, so expect starting at ZULU rather than ALPHA and BRAVO for Statics. If you're not in the mood for scanning, please at least undock in anything and copy paste signatures from Probe Scanner to Wanderer as described in step 2 using Lazy Delete.
- Jump Clone to Scanner Implant Set.
- Yes I've forgotten to do this before. Took me a bit to figure out why scanning was so slow that day.
- Undock Scanner and copy all sigs and anoms from probe scanner to wanderer making sure to turn on lazy delete.
- -
- Make sure you have the right system selected, once you start down the chain Wanderer should auto-select the system you've jumped to.
- You can turn on Always Lazy Delete in the Settings for the Signature Window. Should you accidentally Lazy Delete the wrong system or the wrong signatures you have 10 seconds to press undo.
- -
- To quickly copy, click anything in your probe scanner, hit ctrl+A, ctrl+C, switch to your Wanderer Tab and hit ctrl+V, quick and easy.
- -
- Look at Signatures in Wanderer, Remove any bookmarks in game where the Signature is no longer present.
- Scan Down the Signatures that are unknown in Wanderer, then copy paste the whole list again.
- I won't tell you how to scan, because everyone has their own opinions on it and there is no "Best" way.
- Bookmark any Signatures that are not already bookmarked and are not Wormholes.
- Warp to any Wormholes that are not bookmarked, and follow ChainID methodology to Bookmark it.
- Either warp to 0, 70, or 100. Warping between 5 and 20km can cause you to decloak on the wormhole. I personally use 0 so I can jump through it immediately without needing to bounce.
- Important Quality of Life Step added with Wanderer. Double click the Wormhole in the Signature list on Wanderer, and set the Type. If it's K162 try to identify which class it goes to too, otherwise leave "K162 Type" blank. Also set lifetime if it's 4h or 1h.
- -
- You will shortly see why we do this.
- -
- Splash the first Wormhole you'd like to Chain Scan through, and make a brief note in your head of which sig it is. You have to just get a feeling for which chains are best for whatever your goal is.
- If you're looking to do a lot of Logistics, ignore holes with 4 Hours or less remaining. If necessary roll a Static to get a Chain that isn't less than 4 Hours.
- Always ignore 1 Hour or Less Wormholes.
- Bookmark your *Home or *Farm Hole but don't click submit, launch your probes as you cloak and orbit your return hole at 4,500 meters, center probe formation on your ship and scan 0.5AU. Add the Signature you've now scanned to the bookmark and Submit. If there are targets to kill on D Scan, focus on that after you've bookmarked your return hole, and move your probes out to range in the system so they're off D Scan, or recall them. For this example we will assume you do not run into other players, I expect you to know how to deal with finding players.
- I recommend setting your default orbit to 4,500 meters, it's convenient, keeping your orbit wide but close enough to splash hole immediately after you decloak should you need to.
- You've got a pop-up in your Wanderer page now, asking which of the Signatures you'd like to update. Click the one you just jumped. This will automatically populate the system connection in the Signatures Window.
- In a rare instance where you don't get the pop-up, double click the signature you've just jumped with your prior system selected, and set "Leads To" to the system you're now in, then select the system you're now in again.
- Double Click the System and rename it in accordance with ChainID. Label it with information if applicable.
- Copy all signatures again from Probe Scanner to Wanderer.
- Scan down all Signatures
- As soon as you know something isn't a wormhole you are free to "right-click -> ignore" it, we will clear this shortly but it makes it easier to keep oversight.
- You can also filter out Anomalies for now, but we will add them back in shortly.
- If using Satori-Horigu watch your Probe Timeout, and recall if necessary, simply decloak, redeploy, cloak.
- Clear your ignored list, and filter to include Anomalies again. Then copy to Wanderer again. All signatures in Wanderer should be known, even if not scanned all the way down.
- Check which wormhole signature leads back, double click it in Wanderer and set "Leads To" to your previous system. The Wormhole Type is not necessary.
- Warp to each wormhole, Bookmark it using ChainID and mark it's type and K162 Type (If known) on Wanderer.
- Note now how on Wanderer there are little bars under the system you've just scanned. Those show how many wormholes have not yet been mapped. This tells both you how many more chains you can explore, and other scanners that there's more chains to scan from this system. Setting the type also colours these bars certain colours based on the Wormhole Type.
- -
- -
- Return to Step 8 and continue until you have a connection you like, have found content, or you are bored of scanning.


